Troubleshooting
Enabling WP_Debug In WordPress
WP_Debug is a constant that when enabled will exhibit some PHP errors on the front-end of your website, this is the most valuable tool when troubleshooting your website for errors. If disabled and your website has an error you will see a blank screen or content missing on the website however there will be no error message, making it almost impossible to work out the issue. As for us, we maintain WP_Debug allowed on all our websites. So, if you set up a new plugin or upgrade a Theme you will know immediately if there are any errors and be able to contact the developer to fix them or fix them yourself.
Important: This is an advanced procedure so please proceed with caution, if you don’t have a clear idea of what you are doing, feel free to contact your webhost for assistance.
How To Enable WP_Debug in WordPress
Follow the give steps to enable WP_Debug for your WordPress installation.
- Access your website’s root folder via FTP or SFTP
- Locate the wp-config.php file
- Open this file in a text editor (I prefer sublime text)
- Search for “WP_Debug” and if you find it set the value to true if currently set to false
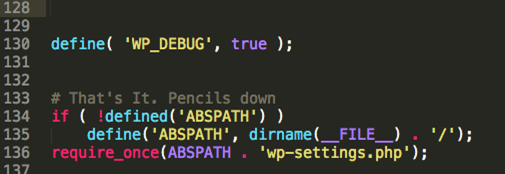
If you couldn’t locate “WP_Debug” then scroll down near the bottom of the file and add the following code right before the line that says “# That’s It. Pencils down”
define( 'WP_DEBUG', true );When it’s done and saved it should look like this:
Troubleshooting Customizer Issues
The WordPress customizer is a core function built-into WordPress so as long as the host supports WordPress subsequently the Customizer must work 100%. Nevertheless, there are a few known plugins which could break things in addition to specific server configurations that might lead to issues. Below is a listing of the troubleshooting measures to go through to find out why your Customizer is not working properly.
Step 1: Test another browser and/or close tabs
We have noticed the WordPress Customizer may get a little buggy from the Chrome browser (particularly once you have several tabs open). From our test we discovered the Customizer performs better in the newest edition of Firefox. Results may vary based upon your personal computer, but it is worth testing out in the event that you have not attempted in this browser. Furthermore, when you’ve got several tabs open on your browser (especially if you’re watching some type of video like YouTube or Netflix) it may slow things down when opening and closing tabs/panels.
Step 2: Clear your Cache
A lot of times people have issues with WordPress since they recently upgraded a plugin, WordPress or Theme and did not clean their cache. So please make certain that you clear it only to be sure that is not the issue.
Step 3: Make Sure Your Host Supports WordPress and just check that your PHP version is up to date.
If a core function is not working it’s possible your webhost doesn’t fully support WordPress, please make sure it does. Specifically the Theme uses anonymous functions that were introduced in PHP 5.3 and if your server has an outdated version of PHP that doesn’t support these functions then the Customizer may not load or will display an error like this “Parse error: syntax error, unexpected T_FUNCTION in…”.
Step 4: Increase Server Memory Limit To PHP
Often the customizer doesn’t save because your memory limit is set too low on your server. This is common on shared hosting plans or other affordable hosting plans.
Step 5: Make sure there aren’t any Debug Errors
Spices was coded with WP_Debug permitted to make certain that there aren’t just one PHP mistakes. Please be sure WP_Debug is allowed on the host and if you find any mistakes, they may be quite helpful in troubleshooting this issue in addition to locating problems with the with plugins or the server.
Step 6: Disable 3rd Party Plugins
Note: If you are an advanced user please skip this step for now and do the other ones since they are much faster and will help troubleshoot the problem quicker. If you’re new to WordPress, hosting…etc, this is the ideal place to get started.
Sometimes 3rd party plugins that aren’t coded properly could break the Customizer. Disable any 3rd party plugin 1 by 1 to test (no need to disable the recommended plugins, these have been fully tested with the Theme). Make sure to clear your cache when disabling plugins 1 by 1 to make sure the Customizer isn’t still loading old code
Step 7: Check Server Error Logs
Checking server error logs is the easiest method to see what may be going on. If the Customizer isn’t saving it will generally save an error in your server error logs. If you have access to them, you should look and see if there is any error when you try saving the Customizer. If you aren’t sure how to interpret the data, you can always contact your webhost for some assistance.
Step 8: Check Child Theme name (too many redirects error)
If you are using a child Theme and you are getting an error when trying to load the customizer that says there has been too many redirects this could be an issue related to your child Theme name. Make sure your child Theme does not have ANY empty spaces and is written in English without any added characters.
Step 9: Contact Support
If you can’t figure out what is wrong, please send temp WordPress and FTP access to us via the form on our site with a message telling us what is wrong, and we’ll be able to look at the problem.
Theme Installation Errors
The Spices Theme should install without any errors, although on some occasions people to encounter errors so here are the most common errors and the solutions:
The package could not be installed. The Theme is missing the style.css stylesheet. One of the most common reasons people have issues is because they try uploading the Full zip that includes sample data, documentation…etc which displays the “The package could not be installed. The Theme is missing the style.css stylesheet.” error. Please make sure you are uploading only the installable Theme which is called Spices.zip. When you download the Theme from your Themesvillage downloads it will give you the full zip which you will need to extract to locate the Theme and the other one is just the installable Theme. Please pay close attention to this.
Are you sure you want to do this? Or 500 Internal Server Errors
This error typically happens for one of two reasons:
a. Your server’s memory limit to PHP is too low (most common).
b. You are trying to upload the Full zip file and not just the installable Theme (please refer to the guide on installing your Theme).
c. The upload limit on your server isn’t large enough and you must update your PHP.INI file to increase the upload_max_filesize value or contact your webhost to fix it.
Didn’t send any data (ERR_EMPTY_RESPONSE)
This error usually means that your server’s upload limit is too small. You should contact your hosting company if you aren’t sure how and get your upload limit increased to at least 20MB. Also make sure you are installing the correct file (Spices.zip file) as mentioned in the first section of this article.
White Screen of Death
A “White Screen of Death” happens when there is a PHP error on the site but WP_Debug isn’t enabled on the server. So, the first thing to do would be to enable WP_Debug so you can read what the actual error is and thus fix the problem.
This usually happens when your WordPress installation isn’t up to date (always keep WordPress up to date) or when a 3rd party plugin is creating a conflict. I would recommend always disabling all plugins and updating WordPress before switching to a new Theme.
Increasing Memory Limit To PHP
Some servers (mostly shared hosting planes usually) have a very low limit to PHP by default which can cause a blank screen (White Screen of Death) or an error on your site. Luckily increasing the memory limit to PHP is very simple and can be done with a small tweak in your wp-config.php file.
Have a look below at how to increase your memory limit or read the documentation on the WordPress CODEX.
Increasing the Memory Limit
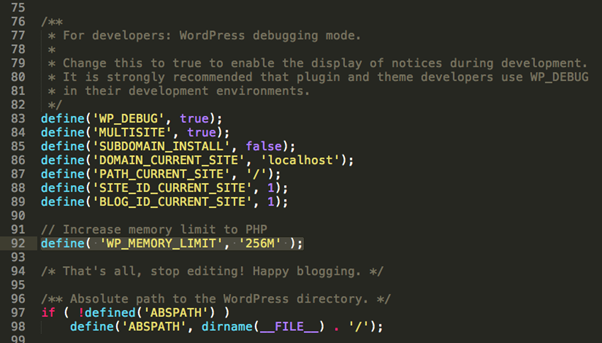
Open your wp-config.php file via FTP and add the following code right before it says “That’s all, stop editing! Happy blogging”:
define( 'WP_MEMORY_LIMIT', '256M' );You can change the 128MB to the value you want. I personally use 256MB on my localhost but 128MB should work quite well for most live sites.
Please make your server settings as given below:
upload_max_filesize: 25M
max_input_time: 300
memory_limit: 256M
max_execution_time: 300
post_max_size: 512M